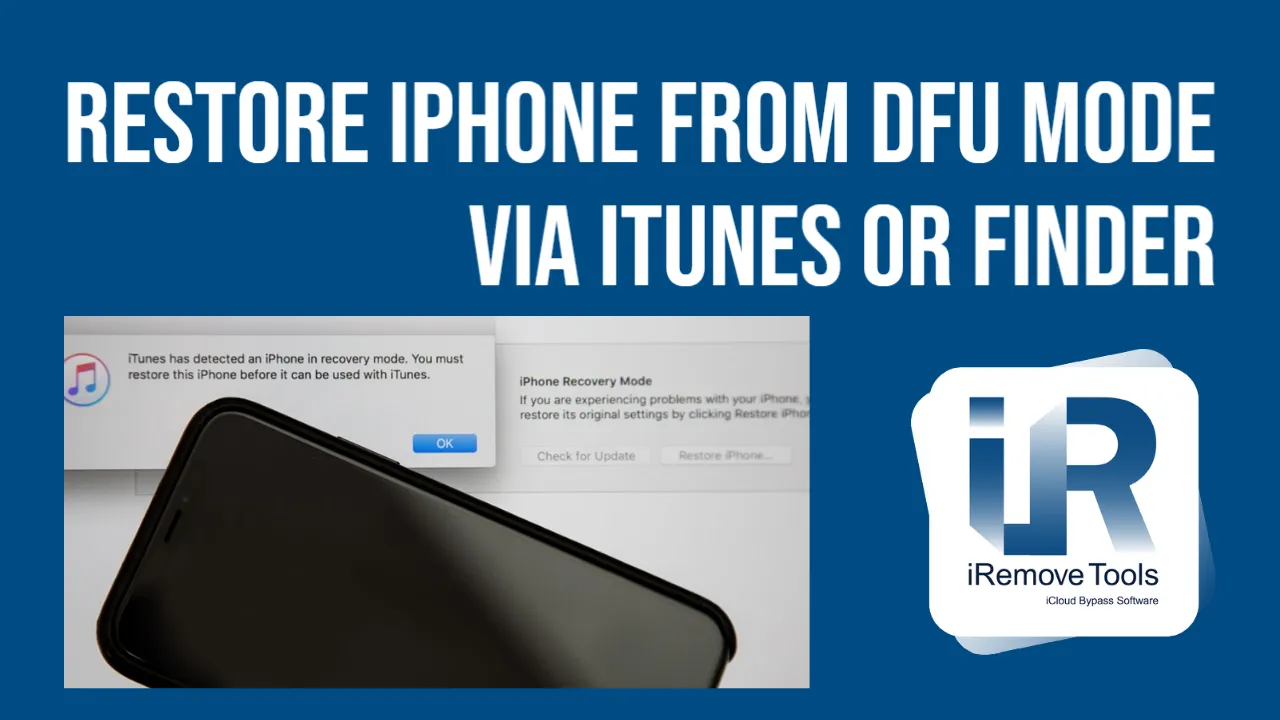
How to Restore iPhone from DFU Mode via iTunes or Finder
You can try an in-depth reset when a regular restore cannot fix your situation and bring your iPhone back to life. The iRemove team has prepared a guide on how to restore the iPhone from DFU mode via iTunes or Finder. Follow it step-by-step to completely erase your smartphone and reload its hardware and software control.
Glosario
- Reasons to Restore iPhone from DFU Mode
- Restore DFU iPhone 8, 8 Plus, X, SE (2nd Gen)
- DFU Restore iPhone 7 and 7 Plus
- Restauración DFU de iPhone 6S, 6, SE (1ª generación) y versiones anteriores
- Cómo salir del modo DFU del iPhone
Reasons to Restore iPhone from DFU Mode
You can try an in-depth reset when a regular restore cannot fix your situation and bring your iPhone back to life. The iRemove team has prepared a guide on how to restore the iPhone from DFU mode via iTunes or Finder. Follow it step-by-step to completely erase your smartphone and reload its hardware and software control.
Before we explain why you need to use iPhone DFU restore, it is a must to tell you more about this term. DFU stands for Device Firmware Upgrade. It is a special mode that helps restore any iPhone from any possible state.
Through DFU, your BootROM accepts iBSS, and it can accept APTicket if you own an A7+ smartphone. The thing is, your Device Firmware Upgrade is a SecureROM's part. You cannot remove it because it is burned into your iPhone hardware.
Restore DFU iPhone 8, 8 Plus, X, SE (2nd Gen)
Find your USB to Lightning cable and a working computer. Ensure that your Windows PC or Mac running Mojave or an earlier version than macOS 10.14 has the most recent iTunes. If you have a computer with macOS 10.15 (Catalina) or newer, you will use Finder.
- With your iPhone 8, X, or newer version, connect to Mac or PC, launch iTunes or Finder.
- Click once your Volume Up on the smartphone. Then click once your Volume Down button.
- Click-hold the Side button. Do so and watch how the display becomes black.
- With a black screen, you should keep holding your Side button and press-hold the Volume Down button for approximately five seconds.
- Let go of only the Side button but still keep pressing Volume Down. Release it when your smartphone is visible in iTunes or Finder.
- Restore DFU iPhone 8 or newer Apple handset.
DFU Restore iPhone 7 and 7 Plus
Use your computer, Mac Mojave or older Apple computer or Windows PC, a USB to Lightning cable, and the most recent iTunes. Work with Finder instead of iTunes if you have Mac Catalina or a most recent macOS device.
- After your iPhone 7/7 Plus (powered on or off) is connected to a computer, launch iTunes or Finder.
- Press these two buttons at once (hold them too), Power (Sleep/Wake) + Volume Down.
- After counting to eight, release only the Power (Sleep/Wake) button while still pressing the Volume Down.
- When your iTunes or Finder shows the iPhone, you can let go of Volume Down. The phone screen must be black. Only when it is dark, have you successfully entered DFU. If you see the Apple logo on your handset screen or iTunes asks you to connect your smartphone, you should repeat all the steps.
- Once in DFU, restore iPhone 7 or 7 Plus.
Restauración DFU de iPhone 6S, 6, SE (1ª generación) y versiones anteriores
Necesitarás un ordenador (Mac o PC), un cable Lightning a USB y el software iTunes. Funcionará para todos los ordenadores Windows y MacOS Mojave (o anteriores). Los propietarios de Macs Catalina utilizarán Finder en lugar de iTunes (funciona de forma similar).
- Inicie iTunes una vez que conecte su iPhone 6S, 6, SE (1ª Gen) a su ordenador. Ten en cuenta que tu iPhone puede estar encendido o apagado (no importa ahora).
- Debes mantener pulsados dos botones a la vez, Home + Side (On/Off/Lock). Cuenta hasta ocho y suelta Side (On/Off/Lock) mientras sigues manteniendo Home.
- Suelta el botón Home sólo cuando iTunes (o Finder) muestre tu smartphone. La pantalla del iPhone debe ser negra y sin logotipos cuando entre en el modo DFU. Por lo tanto, si ves un logotipo o la pantalla no es negra, no has tenido éxito. Sigue las instrucciones anteriores para solucionar la situación.
- Después de entrar en DFU, restaura tu iPhone 6S, SE (1st Gen), 6.
¡Atención! Supongamos que iTunes o Finder tarda más de 15 minutos en restaurar tu iPhone desde el modo DFU, y tu smartphone sale de la Actualización del Firmware del Dispositivo por sí mismo. Entonces, debe repetir los pasos anteriores de nuevo. Es imprescindible entrar en el modo DFU e intentar restaurarlo desde cero.
Recuerde que un iPhone con un componente roto podría no completar la restauración DFU con éxito en algunas situaciones. Si tienes un dispositivo dañado, entrar en el modo DFU puede romperlo.
Cómo salir del modo DFU del iPhone
¿Desea salir del modo usted mismo? Ayudaría si forzara el reinicio del smartphone de Apple utilizando las siguientes combinaciones de botones:
- iPhone 8, 8 Plus, X: Pulse Subir Volumen, pulse Bajar Volumen, pulse-mantener Lado esperando que el teléfono se reinicie;
- iPhone 7, 7 Plus: Mantenga pulsados dos botones, Power (Sleep/Wake) + Volume Down, hasta que el teléfono móvil se reinicie;
- iPhone 6S, 6, SE: Mantén pulsados los botones Home + Side (Encendido/Apagado/Bloqueo) hasta que tu móvil se reinicie.
Ya está. Tu smartphone debería funcionar como si fuera nuevo. Lo mejor es cargarlo y descargarlo unas cuantas veces, dejar que se recalibre, y sus problemas de software desaparecerán. Con suerte, la restauración DFU devolverá la vida a tu iPhone y te permitirá disfrutar de su impecable funcionamiento.
Compartir:
Software de desbloqueo de iPhone y iPad


Software de desbloqueo de Mac


![Software de anulación de la gestión remota de MacOS [MDM]](/assets/img/banners/find-my-mac-unlock-without-icloud-password.svg)
iRemove Noticias

USBLiter8 BootROM Exploit Explained | A12 & A13 Apple Devices
Learn how the USBLiter8 BootROM exploit works on Apple A12 and A13 devices. Explore SecureROM exploitation, Pwned DFU mode, supported devices, security implications, and research applications.
iCloud Unlock for iPhone 15 Series with iRemove Software
Unlock iCloud on iPhone 15 Series effortlessly with iRemove Software. Learn how to bypass Activation Lock on iPhone 15, 15 Plus, 15 Pro, and 15 Pro Max.
Bypass iCloud and Unlock iPhone 14 with the iRemove Software
Bypass the Activation Lock on any iCloud-locked iPhone 14 series model, including the 14 Plus, 14 Pro, and 14 Pro Max, using iRemove Software!
Bypass iCloud Lock from iPhone XR, XS, and XS Max
Use iRemove Software to Bypass iCloud Activation Lock on any iPhone XR, XS, and XS Max models. The fast and effective iCloud Unlock hardware method.

Bypass iCloud on iPhone 11 Series: 11, 11 Pro and 11 Pro Max
Bypass the iCloud Activation Lock on any iPhone 11 series model, including 11 Pro and 11 Pro Max, using the iRemove Activation Lock Bypass Tool!
Remove - Bypass the Activation Lock on iPhone 12 Series
Unlock the Activation Lock on your iPhone 12, 12 Pro, 12 Pro Max, and 12 Mini quickly and easily with iRemove iCloud Bypass Software.
Unlock iPhone 13 with iRemove Software: Easy iCloud Bypass!
Learn how to bypass iCloud and remove Activation Lock from iPhone 13 series (13 Pro, 13 Pro Max) using iRemove Software. Guaranteed success in 2024!

Bypass iOS 16 iCloud Activation Lock Screen
Best iOS 16 iCloud Bypass solution for iPhone and iPad Devices with Activation Lock
Remove Activation Lock without Previous Owner
All methods to ☆ REMOVE ACTIVATION LOCK WITHOUT PREVIOUS OWNER ☆ Ultimate how to guide for iPhone and other iOS users.

Bypass the Activation Lock on an iPad
Reliable Ways to Bypass the Activation Lock on an iPad without Apple ID Password and Previous Owner
¿Sigues buscando ayuda?
No te preocupes. Ponte en contacto con nuestro equipo de soporte. Siempre estaremos encantados de ayudarte.
Contacta con nuestro equipo de soporte técnico